万字解析 go 语言分布式消息队列 NSQ
0 前言
本期和大家一起探讨一款完全基于 go 语言实现的分布式消息队列——nsq.
有关于消息队列 Message Queue 的概念及作用,大家可以参考我之前发表的文章——万字长文解析如何基于Redis实现消息队列,这些基础知识本文不再赘述.
nsq 是一款基于 go 语言开发实现的分布式消息队列组件,在 golang 世界中拥有着很高的认可度和流行性,截止今日在 github 上的 stars 数已高达 23 k. 本期会涉及大量对 nsq 的源码走读环节,主要包含:
- nsq 客户端:https://github.com/nsqio/go-nsq . 本文走读源码版本为:v1.1.0.
- nsq 服务端:https://github.com/nsqio/nsq . 本文走读源码版本为:v1.2.1.
此外有一个拓展性内容,涉及到 nsq 服务端与磁盘的存储交互操作,对应项目为 https://github.com/nsqio/go-diskqueue . 大家感兴趣可自行拓展学习,这部分内容本文不作展开.
本期分享内容的大纲罗列如下:
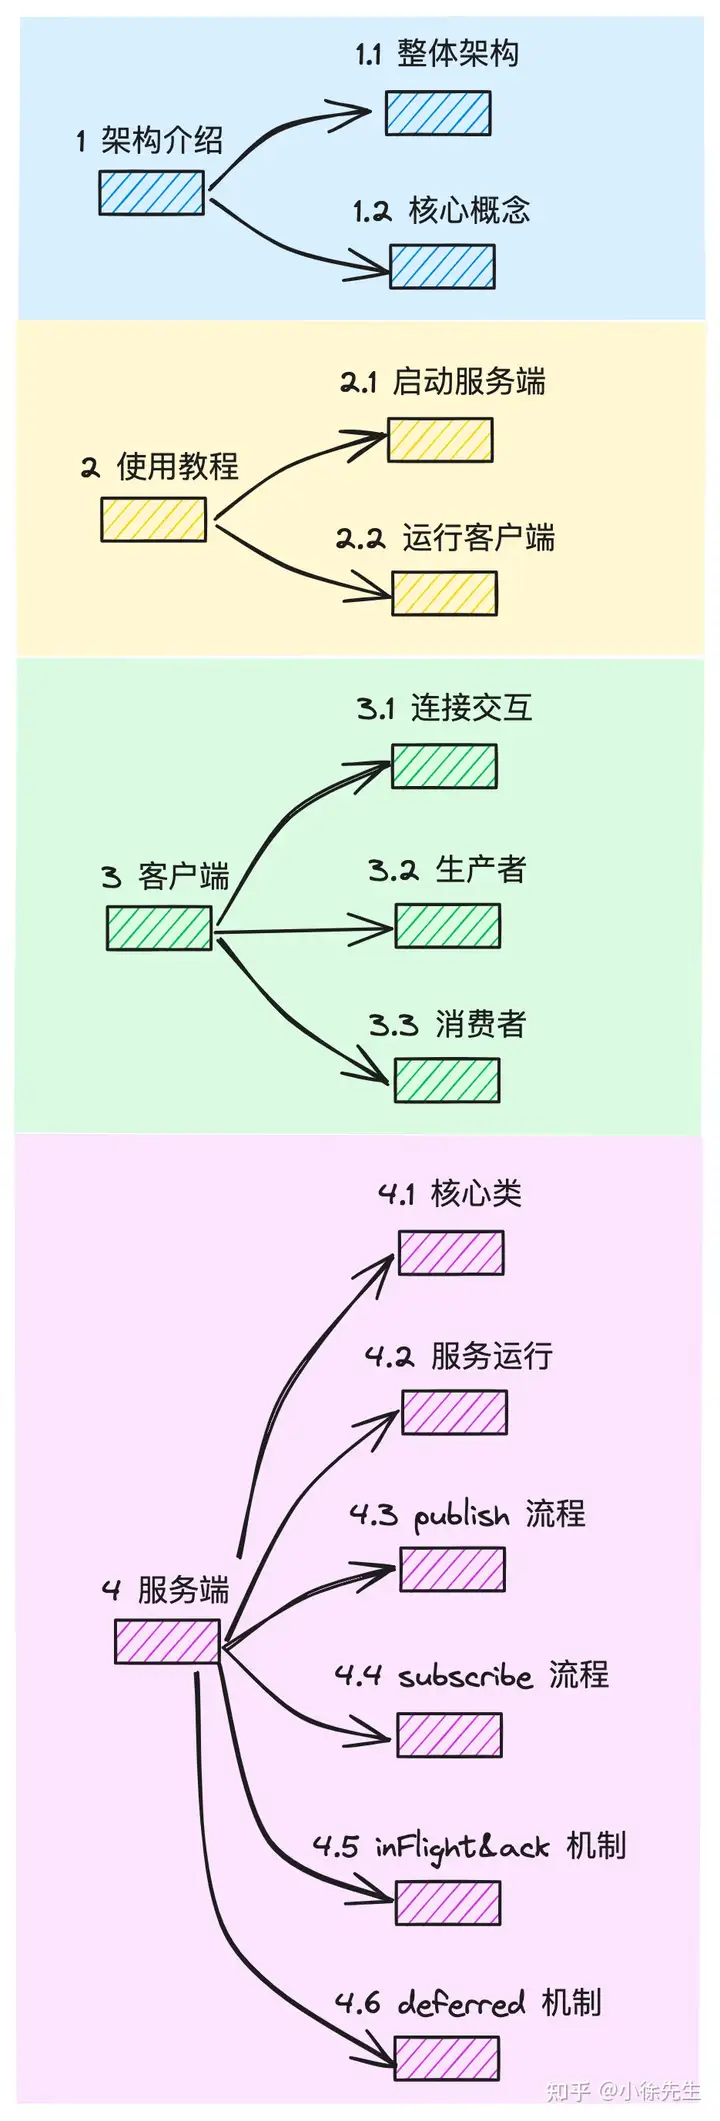
1 架构介绍
本章我们首先来理清楚 nsq 的整体架构和核心概念,在大的方向上建立一定的理解基础,再在后续章节中基于各个主要流程展开技术细节的探讨.
1.1 整体架构
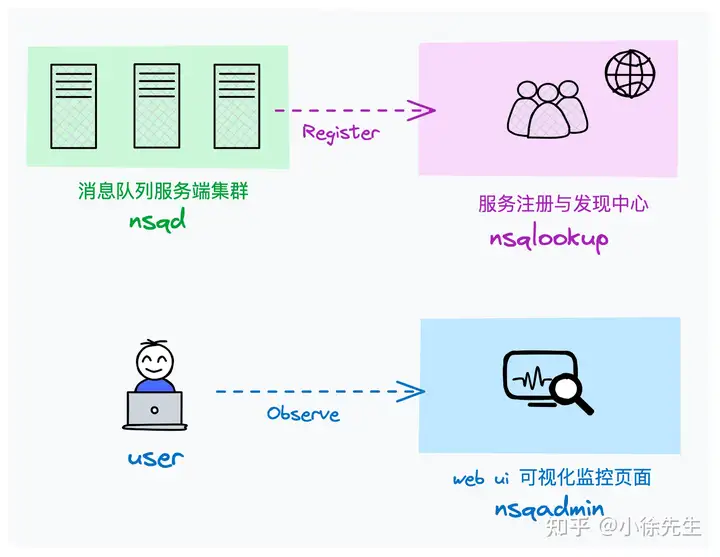
nsq 可以拆分为三个组件:
- nsqd:最核心的消息队列后端模块,负责接收、存储和发送消息
- nsqlookupd:nsq 中的服务发现与注册中心,负责管理 nsqd 节点、topic、channel 之间拓扑映射关系
- nsqadmin:提供了用于实时监控 nsq 集群的 web 可视化界面
1.2 核心概念
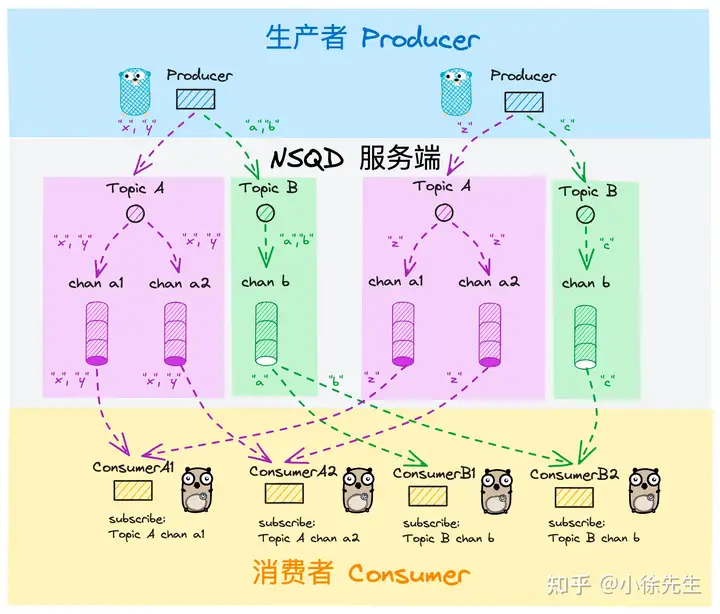
nsq 整体架构如上图所示,其中涉及到的 topic、channel、producer、consumer 等概念下面我们逐一拆解:
- topic:人为定义的消息主题,所有被生产出来的消息首先指定其被发往哪个主题.
- channel:消费方定义的消息频道. channel 与 topic 是多对一关系,每个 channel 都会拥有一份 topic 下的全量完整数据
- producer:消息生产方,生产消息时需要显式指定其从属的 topic
- consumer:消息消费方. 消费消息时需要显式指定主题 topic 以及频道 channel
这里我们着重解释一下 channel 的概念. channel 可以与其他消费队列组件中的 consumer group 消费者组的概念类比来看:
- 首先,channel 与 topic 是一对多关系,每当 topic 有新消息到达时,都会拷贝成多份,逐一发送到每个 channel 当中,保证每个 channel 拥有独立完整的一份数据
- 其次,所有 consumer 在发起订阅时,都需要显式指定 topic + channel 的二维信息
- 最后,channel 下的每一条消息会被随机推送给订阅了该 channel 的 1 名 consumer
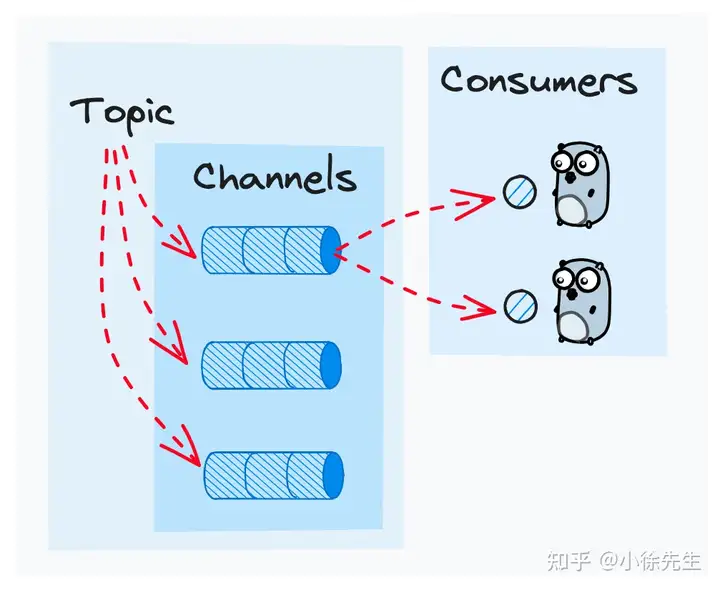
由此可见,所有 subcribe 了相同 channel 的 consumer 之间自动形成了一种类似消费者组的机制,大家各自消费 topic 下数据的一部分,形成数据分治与负载均衡.
倘若某个 consumer 需要获取到 topic 中的全量数据,那也容易,只需要 subscribe 一个不与他人共享的 channel 即可.
nsq 与其他消息队列组件的另一大差异是,其中的 topic 和 channel 采用的都是懒创建的机制,使用方无需显式执行 topic 或者 channel 的创建操作,channel 由首次针对该频道发起 subscribe 订阅操作的 consumer 创建;而 topic 则由首次针对该主题发起 publish 操作的 producer 或者 subscribe 操作的 consumer 创建.
到这里,有关 nsq 的核心概念就介绍得差不多了,建议大家略作消化后,可以回头看一眼本章最开始展示的整体架构图,巩固一下对概念的理解.
2 使用教程
本章开始,我们介绍一下 nsq 的基本用法.
2.1 启动服务端
首先我们介绍,如何在一台 linux 服务器中启动 nsq 服务端.
nsq 的官网下载安装包地址为 https://nsq.io/deployment/installing.html,可以从中下载到对应于 linux 系统的安装包压缩文件.
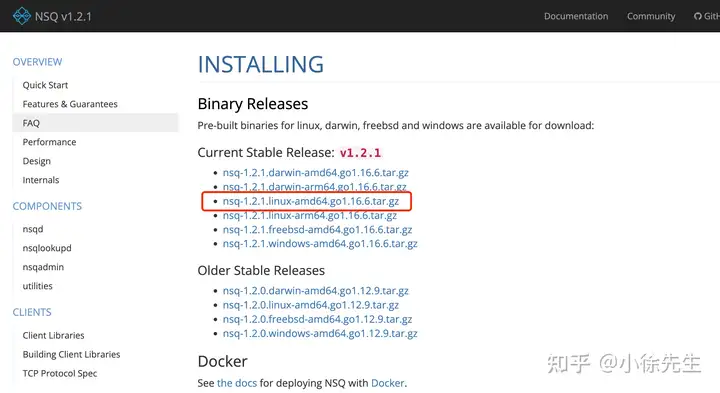
在 linux 服务器上解压文件,然后进入 bin 目录即可一键启动 nsq 服务. 为了避免因为启动服务而使得终端陷入阻塞,我们通过 nohup 指令以守护进程的方式分别启动 nsqlookupd、nsqd 和 nsqadmin 进程:
- 启动 nsqlookupd
脚本:start_lookup.sh
nohup ./nsqlookupd ./nsqlookupd &
exit- 启动 nsqd :
脚本:start_nsqd.sh
nohup ./nsqd --lookupd-tcp-address=127.0.0.1:4160 &
exit- 启动 nsqadmin:
脚本:start_admin.sh
nohup ./nsqadmin --lookupd-http-address=127.0.0.1:4161 &
exit
在 nsqadmin 启动后,即可进入 http://localhost:4171 页面浏览 topic、channel 相关信息:

上述各个进程对应的端口号如下:
- nsqlookupd:tcp 端口:4160,用于 nsqd 集群广播;http 端口:4161,用于客户端访问
- nsqd:tcp 端口: 4150,用于生产者、消费者访问;http 端口: 4151,用于生产者访问
- nsqadmin:端口:4171
2.2 运行客户端
下面展示一下,nsq 客户端的示例代码,其中包括对 consumer 和 producer 的运行启动实例. 具体代码以及注释展示如下:
package main


import (
    "fmt"
    "sync"
    "testing"
    "time"


    "github.com/nsqio/go-nsq"
)


const (
    // 用于测试的消息主题
    testTopic = "my_test_topic"
    // nsqd 服务端地址
    nsqdAddr  = "localhost:4150"
    // 订阅 channelGroupA 的消费者 A1
    consumerA1 = "consumer_a1"
    // 订阅 channelGroupA 的消费者 A2
    consumerA2 = "consumer_a2"
    // 单独订阅 channelGroupB 的消费者 B
    consumerB  = "consumer_b"
    // testTopic 下的 channelA
    channelGroupA = "channel_a"
    // testTopic 下的 channelB
    channelGroupB = "channel_b"
)


// 建立 consumer 与 channel 之间的映射关系
// consumerA1、consumerA2 -> channelA
// consumerB -> channelB
var consumerToChannelGroup = map[string]string{
    consumerA1: channelGroupA,
    consumerA2: channelGroupA,
    consumerB:  channelGroupB,
}


func Test_nsq(t *testing.T) {
    // 消费者消费到消息后的执行逻辑
    msgCallback := func(consumerName string, msg []byte) error {
        t.Logf("i am %s, receive msg: %s", consumerName, msg)
        return nil
    }


    // 运行 producer
    if err := runProducer(); err != nil {
        t.Error(err)
        return
    }


    // 并发运行三个 consumer
    var wg sync.WaitGroup
    for consumer := range consumerToChannelGroup {
        // shadow
        wg.Add(1)
        go func(consumer string) {
            defer wg.Done()
            if err := runConsumer(consumer, msgCallback); err != nil {
                t.Error(err)
            }
        }(consumer)


    }
    wg.Wait()
}


// 运行生产者
func runProducer() error {
    // 通过 addr 直连 nsqd 服务端
    producer, err := nsq.NewProducer(nsqdAddr, nsq.NewConfig())
    if err != nil {
        return err
    }
    defer producer.Stop()


    // 通过 producer.Publish 方法,往 testTopic 中发送三条消息
    for i := 0; i < 3; i++ {
        msg := fmt.Sprintf("hello xiaoxu %d", i)
        if err := producer.Publish(testTopic, []byte(msg)); err != nil {
            return err
        }
    }
    return nil
}


// 用于处理消息的 processor,需要实现 go-nsq 中定义的 msgProcessor interface,核心是实现消息回调处理方法: func HandleMessage(msg *nsq.Message) error
type msgProcessor struct {
    // 消费者名称
    consumerName string
    // 消息回调处理函数
    callback     func(consumerName string, msg []byte) error
}


func newMsgProcessor(consumerName string, callback func(consumerName string, msg []byte) error) *msgProcessor {
    return &msgProcessor{
        consumerName: consumerName,
        callback:     callback,
    }
}


// 消息回调处理
func (m *msgProcessor) HandleMessage(msg *nsq.Message) error {
    // 执行用户定义的业务处理逻辑
    if err := m.callback(m.consumerName, msg.Body); err != nil {
        return err
    }
    // 倘若业务处理成功,则调用 Finish 方法,发送消息的 ack
    msg.Finish()
    return nil
}


// 运行消费者
func runConsumer(consumerName string, callback func(consumerName string, msg []byte) error) error {
    // 根据消费者名获取到对应的 channel
    channel, ok := consumerToChannelGroup[consumerName]
    if !ok {
        return fmt.Errorf("bad name: %s", consumerName)
    }


    // 指定 topic 和 channel,创建 consumer 实例
    consumer, err := nsq.NewConsumer(testTopic, channel, nsq.NewConfig())
    if err != nil {
        return err
    }
    defer consumer.Stop()


    // 添加消息回调处理函数
    consumer.AddHandler(newMsgProcessor(consumerName, callback))

    // consumer 连接到 nsqd 服务端,开启消费流程
    if err = consumer.ConnectToNSQD(nsqdAddr); err != nil {
        return err
    }


    <-time.After(5 * time.Second)
}
按照上述流程运行单测代码后,对应的输出结果如下:
nsq_test.go:32: i am consumer_a1, receive msg: hello xiaoxu 0
    nsq_test.go:32: i am consumer_b, receive msg: hello xiaoxu 0
    nsq_test.go:32: i am consumer_a2, receive msg: hello xiaoxu 1
    nsq_test.go:32: i am consumer_b, receive msg: hello xiaoxu 1
    nsq_test.go:32: i am consumer_a1, receive msg: hello xiaoxu 2
    nsq_test.go:32: i am consumer_b, receive msg: hello xiaoxu 2
可以看到,共享了 channelA 的两个 consumerA1、consumerA2 分摊了 topic 下的消息数据;而独享 channelB 的 consumer 则消费到了 topic 下的全量消息.
3 客户端
本章中,我们带着大家深入到 nsq 客户端项目中,梳理生产者与消费者的运行流程.
nsq 客户端 lib 库开源地址为:https://github.com/nsqio/go-nsq,本文走读源码版本为 v1.1.0
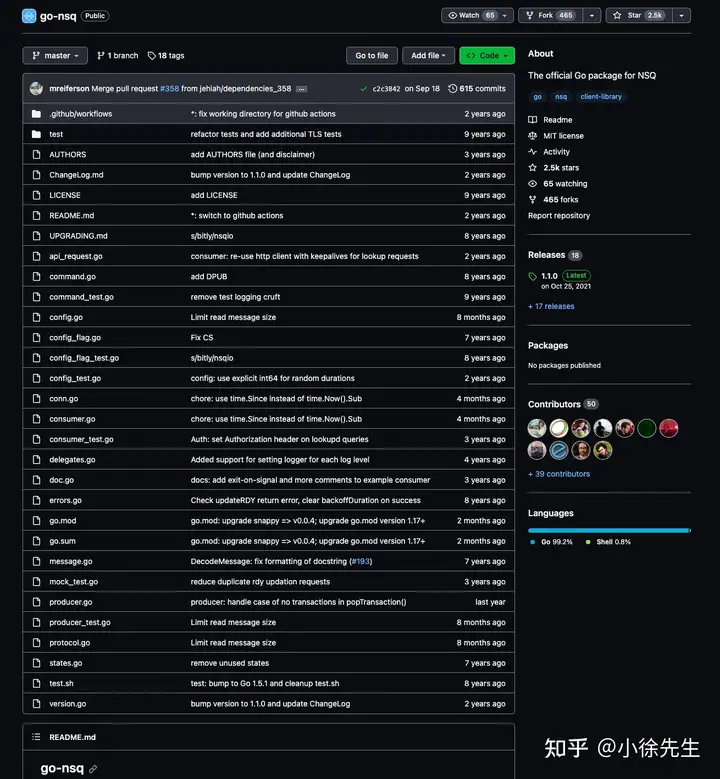
3.1 连接交互
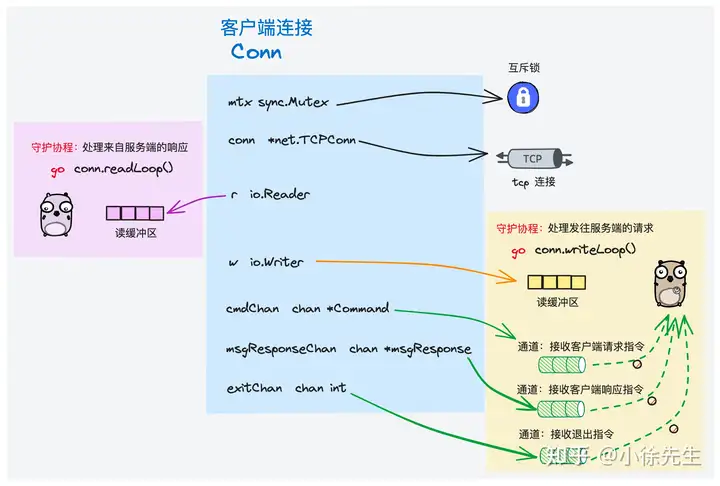
在 nsq 客户端部分,无论是生产者 producer 还是消费者 consumer,在与服务端交互时,都是通过客户端定义类 Conn 来封装表示两端之间建立的连接.
3.1.1 类定义
客户端定义的连接类 Conn 定义如下,其中涉及到的核心字段,我都补充了相应的注释.
这里稍微解释下 inFlight 的概念,其指的是某条消息已经被客户端接收到,但是还未给予服务端 ack 的状态.
type Conn struct {
    // 记录了有多少消息处于未 ack 状态
    messagesInFlight int64
    // ...


    // 互斥锁,保证临界资源一致性
    mtx sync.Mutex
    // ...


    // 真正的 tcp 连接
    conn    *net.TCPConn
    // ...
    // 连接的服务端地址
    addr    string
    // ...

    // 读入口
    r io.Reader
    // 写出口
    w io.Writer
    // writeLoop goroutine 用于接收用户指令的 channel
    cmdChan         chan *Command
    // write goroutine 通过此 channel 接收来自客户端的响应,发往服务端
    msgResponseChan chan *msgResponse
    // 控制 write goroutine 退出的 channel
    exitChan        chan int
    // 并发等待组,保证所有 goroutine 及时回收,conn 才能关闭
    wg        sync.WaitGroup
    // ...
}
3.1.2 创建连接
由客户端实际向服务端发起一笔连接,对应的方法是 Conn.Connect(),其核心步骤包括:
- 通过 net 包向服务端发起 tcp 连接
- 将 Conn 下的 writer 和 reader 设置为这笔 tcp 连接
- 异步启动 Conn 伴生的 readLoop 和 writeLoop goroutine,持续负责接收和发送与服务端之间的往来数据
func (c *Conn) Connect() (*IdentifyResponse, error) {
    dialer := &net.Dialer{
        LocalAddr: c.config.LocalAddr,
        Timeout:   c.config.DialTimeout,
    }


    conn, err := dialer.Dial("tcp", c.addr)
    // ...
    c.conn = conn.(*net.TCPConn)
    c.r = conn
    c.w = conn
    // var MagicV2 = []byte("  V2")
    _, err = c.Write(MagicV2)
    // ...
    c.wg.Add(2)
    // ...
    // 接收来自服务端的响应
    go c.readLoop()
    // 发送发往服务端的请求
    go c.writeLoop()
    return resp, nil
}
有关 readLoop 和 writeLoop 的设计,其核心优势包括:
- 解耦发送请求与接收响应的串行流程,能够实现更加自由的双工通信
- 充分利用 goroutine 和 channel 的优势,通过 for 自旋 + select 多路复用的方式,保证两个 loop goroutinie 能够在监听到退出指令时熔断流程,比如 context 的 cancel、timeout 事件,比如 exitChan 的关闭事件等
这种读写 loop 模式在很多 go 语言底层通信框架中都有采用,比较经典的案例包括 go 语言中的 net/http 标准库,大家如果感兴趣可以阅读我之前发表的这篇文章——Golang HTTP 标准库实现原理.
有关 Conn 中的 readLoop、writeLoop 部分内容,在本文 3.2、3.3 小节介绍生产者 producer 和 消费者 consumer 模块时,会略作展开.
3.2 生产者
下面我们来介绍一下,在客户端视角下,生产者 producer 向服务端生产消息的 publish 流程.
3.2.1 类定义
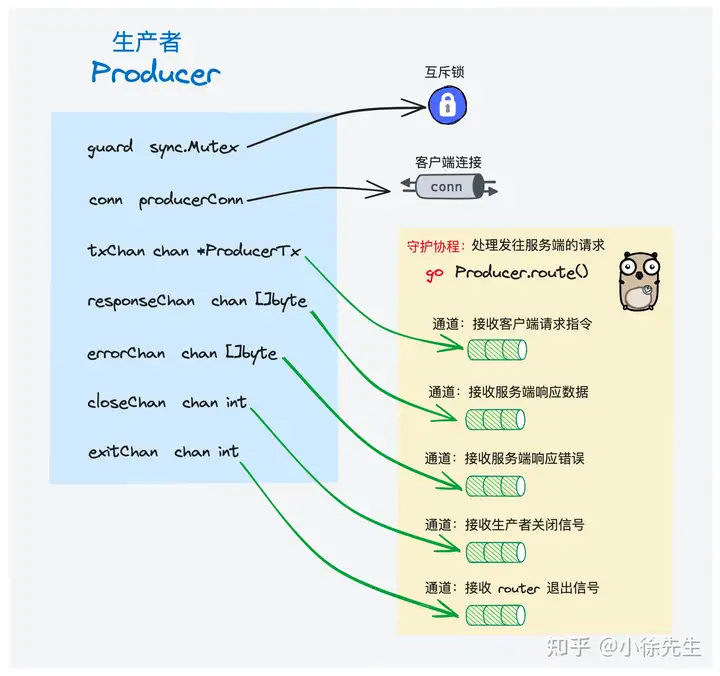
生产者 producer 类定义如下,核心字段均已给出相应注释.
值得一提的是,producer 在创建好与服务端交互的连接 Conn 后,也会启动一个常驻的 router goroutine,负责持续接收来自客户端的指令,并复用 Conn 将指令发送到服务端.
// 生产者
type Producer struct {
    // 生产者标识 id
    id     int64
    // 连接的 nsqd 服务器地址
    addr   string
    // 内置的客户端连接,其实现类是 3.1 小节中的 Conn. 次数声明为 producerConn interface,是为 producer 屏蔽了一些生产者无需感知的细节
    conn   producerConn
    // ...
    // 生产者 router goroutine 接收服务端响应的 channel
    responseChan chan []byte
    // 生产者 router goroutine 接收错误的 channel
    errorChan    chan []byte
    // 生产者 router goroutine 接收生产者关闭信号的 channel
    closeChan    chan int
    // 生产者 router goroutine 接收 publish 指令的 channel
    transactionChan chan *ProducerTransaction
    // ...
    // 生产者的状态
    state           int32
    // 当前有多少 publish 指令并发执行
    concurrentProducers int32
    // 生产者 router goroutine 接收退出信号的 channel
    exitChan            chan int
    // 并发等待组,保证 producer 关闭前及时回收所有 goroutine
    wg                  sync.WaitGroup
    // 互斥锁
    guard               sync.Mutex
}
3.2.2 publish 指令
生产者 producer 生产消息的入口方法为 Producer.Publish(),底层会组装出一个 PUB 指令,并调用 Producer.sendCommand() 方法发送指令.
// Publish synchronously publishes a message body to the specified topic, returning
// an error if publish failed
func (w *Producer) Publish(topic string, body []byte) error {
    return w.sendCommand(Publish(topic, body))
}
PUB 指令:
// Publish creates a new Command to write a message to a given topic
func Publish(topic string, body []byte) *Command {
    var params = [][]byte{[]byte(topic)}
    return &Command{[]byte("PUB"), params, body}
}
3.2.3 发送指令
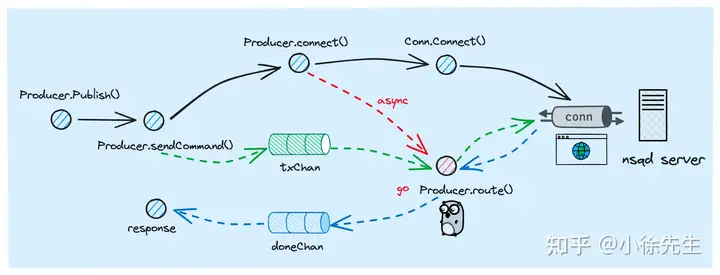
producer 发送指令的主流程如上图所示,核心步骤包括:
- 首次发送指令时,需要调用 Producer.connect() 方法创建一笔与服务端通信的 Conn
- 通过 Producer.transactionChan 通道,将指令发送到 Producer 的守护协程 router goroutine 当中
- router goroutine 接收到指令后,会调用 Conn.WriteCommand() 方法,将指令发放服务端
func (w *Producer) sendCommand(cmd *Command) error {
    doneChan := make(chan *ProducerTransaction)
    err := w.sendCommandAsync(cmd, doneChan, nil)
    // ...
    t := <-doneChan
    return t.Error
}
func (w *Producer) sendCommandAsync(cmd *Command, doneChan chan *ProducerTransaction, args []interface{}) error {
    // keep track of how many outstanding producers we're dealing with
    // in order to later ensure that we clean them all up...
    atomic.AddInt32(&w.concurrentProducers, 1)
    defer atomic.AddInt32(&w.concurrentProducers, -1)


    if atomic.LoadInt32(&w.state) != StateConnected {
        err := w.connect()
        // ...
    }


    t := &ProducerTransaction{
        cmd:      cmd,
        doneChan: doneChan,
        Args:     args,
    }


    select {
    case w.transactionChan <- t:
    case <-w.exitChan:
        return ErrStopped
    }


    return nil
}
可以看到,在 Producer.connect() 方法中:
- 创建了一个 Conn 实例
- 调用 Conn.Connect() 方法实际向服务端发起连接(这个过程中也会完成 readLoop 和 writeLoop goroutine 的启动)
- 异步启动了 router goroutine,负责持续接收指令,并通过 Conn 与服务端交互
func (w *Producer) connect() error {
    w.guard.Lock()
    defer w.guard.Unlock()


    // ...
    w.conn = NewConn(w.addr, &w.config, &producerConnDelegate{w})
    // ...
    // producer 创建和 nsqd 之间的连接
    _, err := w.conn.Connect()
    // ...
    atomic.StoreInt32(&w.state, StateConnected)
    w.closeChan = make(chan int)
    w.wg.Add(1)
    go w.router()


    return nil
}
router goroutine 的运行框架如下,主要通过 for + select 的形式,持续接收来自 Producer.transactionChan 通道的指令,将其发往服务端.
func (w *Producer) router() {
    for {
        select {
        case t := <-w.transactionChan:
            w.transactions = append(w.transactions, t)
            err := w.conn.WriteCommand(t.cmd)
            // ...
        // ...
        case <-w.closeChan:
            goto exit
        case <-w.exitChan:
            goto exit
        }
    }


// ...
}
3.2.4 接收响应

下面我们来理一下,producer 在发送完 PUB 指令后,又要如何接收到来自服务端的响应. 大家可以结合上面这张流程图,和我们深入到下面的源码走读环节:
步骤 I:在 Conn.readLoop() 方法中,读取到来自服务端的响应,通过调用 Producer.onConnResponse() 方法,将数据发送到 Producer.responseChan 当中
func (c *Conn) readLoop() {
    delegate := &connMessageDelegate{c}
    for {
        // ...


        frameType, data, err := ReadUnpackedResponse(c, c.config.MaxMsgSize)
        // ...


        switch frameType {
        case FrameTypeResponse:
            c.delegate.OnResponse(c, data)
        // ...
        }
    }
    // ...
}
func (d *producerConnDelegate) OnResponse(c *Conn, data []byte)       { d.w.onConnResponse(c, data) }
func (w *Producer) onConnResponse(c *Conn, data []byte) { w.responseChan <- data }步骤II:Producer 的 router goroutine 通过 Producer.responseChan 接收到响应数据,通过调用 Producer.popTransaction(...) 方法,将响应推送到 doneChan 当中
func (w *Producer) router() {
    for {
        select {
        // ...
        case data := <-w.responseChan:
            w.popTransaction(FrameTypeResponse, data)
        case data := <-w.errorChan:
            w.popTransaction(FrameTypeError, data)
        // ...
    }


    // ...
}
func (w *Producer) popTransaction(frameType int32, data []byte) {
    // ...
    t := w.transactions[0]
    // ...
    t.finish()
}
func (t *ProducerTransaction) finish() {
    if t.doneChan != nil {
        t.doneChan <- t
    }
}步骤III:客户端通过在 Producer.sendCommand 方法中阻塞等待来自 doneChan 的数据,接收到后将其中的错误返回给上层.
func (w *Producer) sendCommand(cmd *Command) error {
    doneChan := make(chan *ProducerTransaction)
    err := w.sendCommandAsync(cmd, doneChan, nil)
    // ...
    t := <-doneChan
    return t.Error
}
3.3 消费者
接下来梳理一下,消费者 consumer 订阅、消费以及 ack 的流程.
3.3.1 类定义
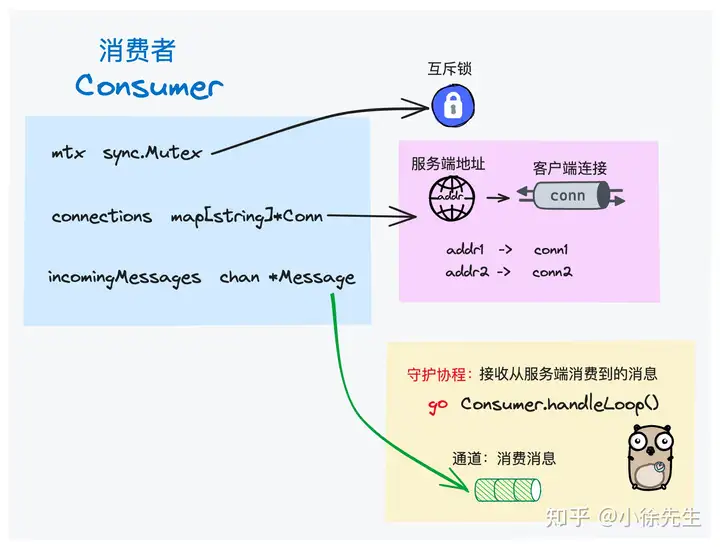
客户端关于消费者的类定义如下. 每当用户注册消息回调处理函数 handler 时,consumer 就会启动一个 handleLoop goroutine,负责接收消息并调用相应的处理函数.
需要注意,consumer 在被创建出来时,就需要明确指定其订阅的 topic 以及 chanel.
type Consumer struct {
    // ...
    // 互斥锁
    mtx sync.RWMutex


    // ...
    // 消费者标识 id
    id      int64
    // 消费者订阅的 topic
    topic   string
    // 消费者订阅的 channel
    channel string
    // ...
    // 用于接收消息的 channel
    incomingMessages chan *Message


    // ...
    pendingConnections map[string]*Conn
    connections        map[string]*Conn

    // 连接的 nsqd 地址
    nsqdTCPAddrs []string


    // ...
}
3.3.2 添加 handler
用户可以通过调用 Consumer.AddHandler(...) 方法,针对每个 handler 会启动一个 handleLoop goroutine 用于在消费到消息时执行预定义的回调函数.
需要注意的是,倘若用户注册了多个 handler,最终每条消息只会随机被其中一个 handler 处理.
func (r *Consumer) AddHandler(handler Handler) {
    r.AddConcurrentHandlers(handler, 1)
}
func (r *Consumer) AddConcurrentHandlers(handler Handler, concurrency int) {
    // ...
    atomic.AddInt32(&r.runningHandlers, int32(concurrency))
    for i := 0; i < concurrency; i++ {
        go r.handlerLoop(handler)
    }
}
func (r *Consumer) handlerLoop(handler Handler) {
    // ...
    for {
        message, ok := <-r.incomingMessages
        // ...
        err := handler.HandleMessage(message)
        // ...
    }


    // ...
}
3.3.3 连接服务端
消费者通过调用 Consumer.ConnectToNSQD(...) 方法,实现与 nsqd 服务端的连接交互,其中核心步骤包括:
- 调用 NewConn(...) 方法,创建 Conn 实例
- 调用 Conn.Connect(...) 方法,实际向服务端发起连接
- 调用 Conn.WriteCommand(...) 方法,向服务端发送 SUB 指令
func (r *Consumer) ConnectToNSQD(addr string) error {
    // 创建链接
    conn := NewConn(addr, &r.config, &consumerConnDelegate{r})
    // ...
    r.mtx.Lock()
    _, pendingOk := r.pendingConnections[addr]
    _, ok := r.connections[addr]
    // ...
    r.pendingConnections[addr] = conn
    if idx := indexOf(addr, r.nsqdTCPAddrs); idx == -1 {
        r.nsqdTCPAddrs = append(r.nsqdTCPAddrs, addr)
    }
    r.mtx.Unlock()


    // ...
    resp, err := conn.Connect()
    // ...


    // ...
    cmd := Subscribe(r.topic, r.channel)
    err = conn.WriteCommand(cmd)
    // ...
    r.mtx.Lock()
    delete(r.pendingConnections, addr)
    r.connections[addr] = conn
    r.mtx.Unlock()
    // ...
    return nil
}
3.3.4 消费消息
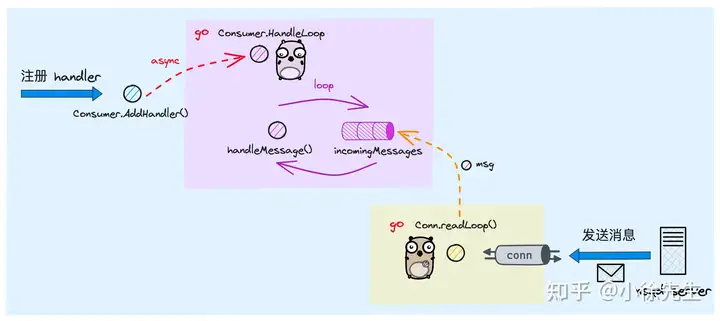
当指定 topic channel 下有新消息产生时,consumer 持有的 conn 会通过 readLoop goroutine 接收到对应的消息,并调用 Consumer.onConnMessage(...) 方法,将消息推送到 Consumer.incomingMessages 通道中.
func (c *Conn) readLoop() {
    delegate := &connMessageDelegate{c}
    for {
        // ...


        frameType, data, err := ReadUnpackedResponse(c, c.config.MaxMsgSize)
        // ...


        switch frameType {
        // ...
        case FrameTypeMessage:
            msg, err := DecodeMessage(data)
            // ...
            c.delegate.OnMessage(c, msg)
        // ...
    }


    // ...
}
func (d *consumerConnDelegate) OnMessage(c *Conn, m *Message)         { d.r.onConnMessage(c, m) }
func (r *Consumer) onConnMessage(c *Conn, msg *Message) {
    // ...
    r.incomingMessages <- msg
}
此前在注册 consumer handler 时启动的 handlerLoop goroutine 便会通过 Consumer.incomingMessages 通道获取到消息,并调用相应的 handler 执行回调处理逻辑.
func (r *Consumer) handlerLoop(handler Handler) {
    // ...
    for {
        message, ok := <-r.incomingMessages
        // ...
        err := handler.HandleMessage(message)
        // ...
    }


    // ...
}
3.3.5 消息 ack

为防止消息丢失,nsq 中同样支持了 consumer ack 机制.
consumer 在接收到消息并成功调用 handler 回调处理函数后,可以通过调用 Message.Finish() 方法,向服务端发送 ack 指令,确认消息已成功接收.
倘若服务端超时未收到 ack 响应,则会默认消息已丢失,会重新推送一轮消息.
consumer ack 流程的核心代码展示如下,在 Conn.onMessageFinish(...) 方法中,会通过 Conn.msgResponseChan 通道将数据推送到 Conn writeLoop goroutine 当中,由其负责将请求发往 nsqd 服务端.
func (m *Message) Finish() {
    .// ..
    m.Delegate.OnFinish(m)
}
func (d *connMessageDelegate) OnFinish(m *Message) { d.c.onMessageFinish(m) }
func (c *Conn) onMessageFinish(m *Message) {
    c.msgResponseChan <- &msgResponse{msg: m, cmd: Finish(m.ID), success: true}
}
Conn.writeLoop 是 Conn 负责向服务端发送指令的常驻 goroutine,其在接收到来自 Consumer.msgResponseChan 通道的数据后,会根据其成功状态,选择调用 OnMessageFinished 或者 OnMessageRequeued 将其封装成 ack 或者重试指令,最后调用 Conn.WriteCommand(...) 方法将指令发往服务端.
func (c *Conn) writeLoop() {
    for {
        select {
        // ...
        // ...
        case resp := <-c.msgResponseChan:
            // ...
            msgsInFlight := atomic.AddInt64(&c.messagesInFlight, -1)


            if resp.success {
                c.log(LogLevelDebug, "FIN %s", resp.msg.ID)
                c.delegate.OnMessageFinished(c, resp.msg)
                c.delegate.OnResume(c)
            } else {
                c.log(LogLevelDebug, "REQ %s", resp.msg.ID)
                c.delegate.OnMessageRequeued(c, resp.msg)
                if resp.backoff {
                    c.delegate.OnBackoff(c)
                } else {
                    c.delegate.OnContinue(c)
                }
            }


            err := c.WriteCommand(resp.cmd)
            // ...
        }
    }
    // ...
}
4 服务端
接下来进入本文最核心的章节,我们来揭示一下 nsq 服务端的底层实现原理.
nsq 服务端开源地址:https://github.com/nsqio/nsq 本文走读源码的版本为: v1.2.1
4.1 核心类
首先统一梳理一下,nsq 服务端所涉及到的几个核心类.
4.1.1 nsqd
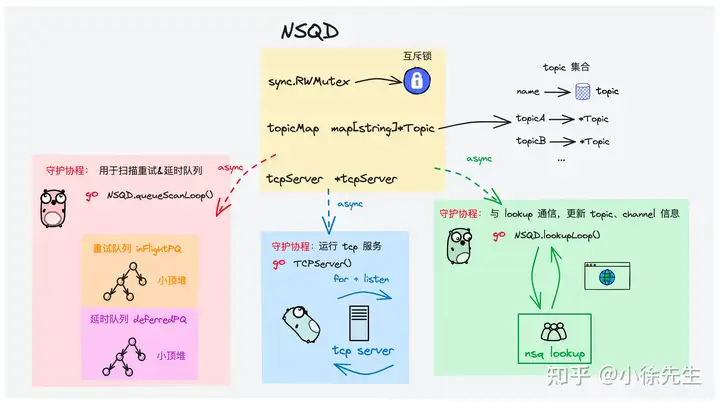
NSQD 类对应于一个 nsqd 节点,其中封装了各类重要信息:
- topicMap:当前 nsqd 节点下包含的 topic 集合
- lookupPeers:倘若启用集群模式,该字段标识出集群中其他节点的信息
- tcpServer:nsqd 节点下的 tcp 服务,用于接收处理来自客户端的各种请求指令
type NSQD struct {
    // 节点内递增的客户端 id 序号,为每个到来的客户端请求分配唯一的标识 id
    clientIDSequence int64
    // 一把读写锁,保证临界资源并发安全
    sync.RWMutex

    // ...
    // 存在的 topic 集合
    topicMap map[string]*Topic


    // 集群中的其他 nsqd 节点
    lookupPeers atomic.Value
    // 运行的 tcp server
    tcpServer     *tcpServer
    // tcp server 使用的端口监听器
    tcpListener   net.Listener
    // http server 使用的端口监听器
    httpListener  net.Listener
    // https server 使用的端口监听器
    httpsListener net.Listener
    // ...


    // 用于回收派生出去的 goroutine
    exitChan             chan int
    // 并发等待组工具,保证派发出去的 goroutine 都能得到及时回收
    waitGroup            util.WaitGroupWrapper
    // 集群信息
    ci *clusterinfo.ClusterInfo
}
4.1.2 topic
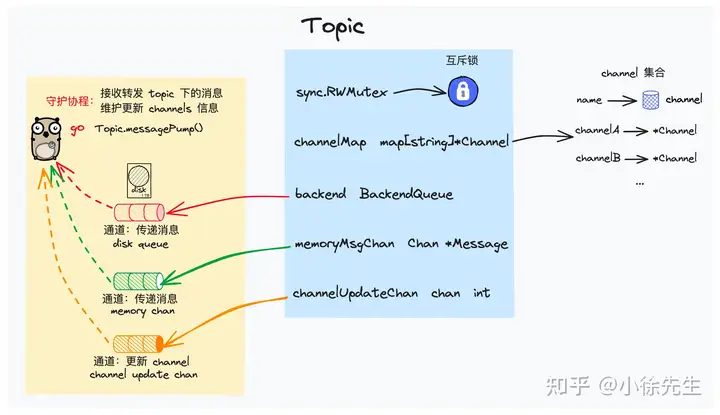
Topic 对应为一个消息主题,其下包含核心字段:
- channelMap:topic 下的 channel 集合
- memoryMsgChan:有新消息到达时,在内存中通过此通道向 topic 传递消息
- backend:当 memoryMsgChan 容量达到上限时,则通过磁盘文件向 topic 传递消息
- nsqd:从属的 nsqd 模块
type Topic struct {
    // 统计消息数量和大小
    messageCount uint64
    messageBytes uint64

    // 读写锁,保证临界资源并发安全
    sync.RWMutex


    // 当前 topic 名称
    name              string
    // 当前 topic 下存在的 channel 集合
    channelMap        map[string]*Channel
    // 当 memoryMsgChan 满了,消息通过该组件持久化落盘
    backend           BackendQueue
    // 用于在内存中传递当前 topic 下的消息
    memoryMsgChan     chan *Message
    // 通知 pump goroutine 启动
    startChan         chan int
    // 通知 pump goroutine 退出
    exitChan          chan int
    // 通知 pump goroutine channels 有更新
    channelUpdateChan chan int
    // 等待组工具,保证当前 topic 下派生出的 goroutine 能够被回收
    waitGroup         util.WaitGroupWrapper
    // 消息 id 生成器
    idFactory         *guidFactory


    // ...
    // 从属的 nsqd 模块
    nsqd *NSQD
}
在 topic 被构造出来时,会调用 Topic.messagePump(...) 方法,异步启动一个 goroutine,负责持续接收分配给该 topic 的消息,并将消息逐一发送给该 topic 下的每个 channel
// Topic constructor
func NewTopic(topicName string, nsqd *NSQD, deleteCallback func(*Topic)) *Topic {
    // 构造 topic 实例
    t := &Topic{
        // ...
    }
    // ...


    // 启动 topic 下的 pump goroutine
    t.waitGroup.Wrap(t.messagePump)


    // ...
    // 返回 topic 实例
    return t
}
topic.messagePump 方法非常核心,这里先展示一下其核心源码,该方法在后续 4.3 小节的 publish 流程中还会有所涉及.
func (t *Topic) messagePump() {
    var msg *Message
    var buf []byte
    var err error
    var chans []*Channel
    var memoryMsgChan chan *Message
    var backendChan <-chan []byte


    // ...
    t.RLock()
    for _, c := range t.channelMap {
        chans = append(chans, c)
    }
    t.RUnlock()
    if len(chans) > 0 && !t.IsPaused() {
        // 获取基于内存的 memoryChan 和基于磁盘的 backendChan
        memoryMsgChan = t.memoryMsgChan
        backendChan = t.backend.ReadChan()
    }


    // main message loop
    for {
        select {
        // 通过内存通道接收消息
        case msg = <-memoryMsgChan:
        // 通过磁盘通道接收消息
        case buf = <-backendChan:
            msg, err = decodeMessage(buf)
            // ...
        // 倘若和 lookupd 通信发送 channel 有变更,则需要对 channels list 进行更新
        case <-t.channelUpdateChan:
            chans = chans[:0]
            t.RLock()
            for _, c := range t.channelMap {
                chans = append(chans, c)
            }
            t.RUnlock()
            if len(chans) == 0 || t.IsPaused() {
                memoryMsgChan = nil
                backendChan = nil
            } else {
                memoryMsgChan = t.memoryMsgChan
                backendChan = t.backend.ReadChan()
            }
            continue
        // ...
        }


        // 遍历 topic 下所有 channel,一一将消息投递过去
        for i, channel := range chans {
            chanMsg := msg
            // ...
            // 倘若消息类型为延时消息,则将其添加到延时队列
            if chanMsg.deferred != 0 {
                channel.PutMessageDeferred(chanMsg, chanMsg.deferred)
                continue
            }
            // 将消息逐一投递到 topic 下的每个 channel 中
            err := channel.PutMessage(chanMsg)
            // ...
        }
    }


    // ...
}
4.1.3 channel
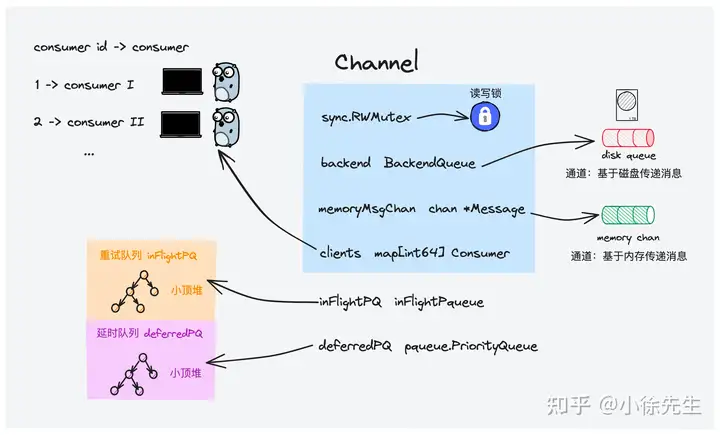
Channel 对应为一个消息频道,
- memoryMsgChan:有新消息到达时,在内存中通过此通道向 channel 传递消息
- backend:当 memoryMsgChan 容量达到上限时,则通过磁盘文件向 channel 传递消息
- clients: 订阅该 channel 的 consumer 集合
- deferredPQ:channel 下的延时消息队列,基于小顶堆实现
- inFlightPQ:channel 下的待 ack 确认消息队列,基于小顶堆实现
值得一提的是,channel 下的 memoryMsgChan 和 backend 会同时被所有订阅了该 channel 的 consumer client goroutine 所接收,因此 channel 下的同一条消息只会随机被某个 consumer 消费到.
type Channel struct {
    // 一些计数器
    requeueCount uint64
    messageCount uint64
    timeoutCount uint64


    // 读写锁,保证临界资源并发安全
    sync.RWMutex
    // 从属的 topic 名称
    topicName string
    // 当前 channel 名称
    name      string
    // 从属的 nsqd 模块
    nsqd      *NSQD
    // 当 memoryMsgChan 满了,则通过该组件将消息落盘传递
    backend BackendQueue
    // 用于在内存中传递当前 channel 下的消息
    memoryMsgChan chan *Message
    // ...
    // 记录当前 channel 下的 consumer 集合
    clients        map[int64]Consumer
    // 延时消息集合
    deferredMessages map[MessageID]*pqueue.Item
    // 延时消息队列,底层基于一个小顶堆实现,以执行时间戳作为排序的键
    deferredPQ       pqueue.PriorityQueue
    // 保护延时消息队列的互斥锁
    deferredMutex    sync.Mutex
    // 重试(待确认)消息集合
    inFlightMessages map[MessageID]*Message
    // 重试(待确认)消息队列,底层基于一个小顶堆实现,以执行时间戳作为排序的键
    inFlightPQ       inFlightPqueue
    // 保护重试(待确认)消息队列的互斥锁
    inFlightMutex    sync.Mutex
}
4.1.4 deferredPQ
延时队列 deferredQ 和待 ack 队列 inFlightPQ 底层数据结构类似,都是基于时间戳进行排序的小顶堆. 这里我们以 deferredPQ 为例展开介绍.
在 deferredQ 中使用了 golang container/heap 标准库中的堆结构,其中定义的堆 interface 如下:
type Interface interface {
    sort.Interface
    Push(x any) // add x as element Len()
    Pop() any   // remove and return element Len() - 1.
}
type Interface interface {
    // 返回堆的长度
    Len() int


    // 判断堆中元素大小的规则
    Less(i, j int) bool


    // 交换 index = i 和 index = j 的两个元素
    Swap(i, j int)
}
在 nsq 中定义了延时队列类型 PriorityQueue,逐一实现了上述 interface 的各个方法. 其中,用于比较元素大小的 Item.Priority 对应就是一条消息的执行时间戳.
type Item struct {
    Value    interface{}
    Priority int64
    Index    int
}


// this is a priority queue as implemented by a min heap
// ie. the 0th element is the *lowest* value
type PriorityQueue []*Item


func New(capacity int) PriorityQueue {
    return make(PriorityQueue, 0, capacity)
}


func (pq PriorityQueue) Len() int {
    return len(pq)
}


func (pq PriorityQueue) Less(i, j int) bool {
    return pq[i].Priority < pq[j].Priority
}


func (pq PriorityQueue) Swap(i, j int) {
    pq[i], pq[j] = pq[j], pq[i]
    pq[i].Index = i
    pq[j].Index = j
}


func (pq *PriorityQueue) Push(x interface{}) {
    n := len(*pq)
    c := cap(*pq)
    if n+1 > c {
        npq := make(PriorityQueue, n, c*2)
        copy(npq, *pq)
        *pq = npq
    }
    *pq = (*pq)[0 : n+1]
    item := x.(*Item)
    item.Index = n
    (*pq)[n] = item
}


func (pq *PriorityQueue) Pop() interface{} {
    n := len(*pq)
    c := cap(*pq)
    if n < (c/2) && c > 25 {
        npq := make(PriorityQueue, n, c/2)
        copy(npq, *pq)
        *pq = npq
    }
    item := (*pq)[n-1]
    item.Index = -1
    *pq = (*pq)[0 : n-1]
    return item
}
在 PriorityQueue 中专门实现了一个 PriorityQueue.PeekAndShift(...) 方法,其作用是传入一个指定时间戳 max,倘若堆顶消息时间戳小于等于 max,则 pop 弹出,否则不执行任何操作.
func (pq *PriorityQueue) PeekAndShift(max int64) (*Item, int64) {
    if pq.Len() == 0 {
        return nil, 0
    }


    item := (*pq)[0]
    if item.Priority > max {
        return nil, item.Priority - max
    }
    heap.Remove(pq, 0)


    return item, 0
}
往延时队列中添加消息的方法入口为 Channel.addToDeferredPQ(...),其中会把一条延时消息封装成一个 pqueue.Item,然后调用 container/heap 包下的 Push 方法,里面会实现新元素入堆的 heapInsert 操作.
func (c *Channel) addToDeferredPQ(item *pqueue.Item) {
    c.deferredMutex.Lock()
    heap.Push(&c.deferredPQ, item)
    c.deferredMutex.Unlock()
}
介绍完几个核心类之后,下面我们开始针对几个核心流程进行梳理总结.
4.2 服务运行
首先我们介绍一下,nsqd 服务端是如何启动运行的.
4.2.1 宏观流程
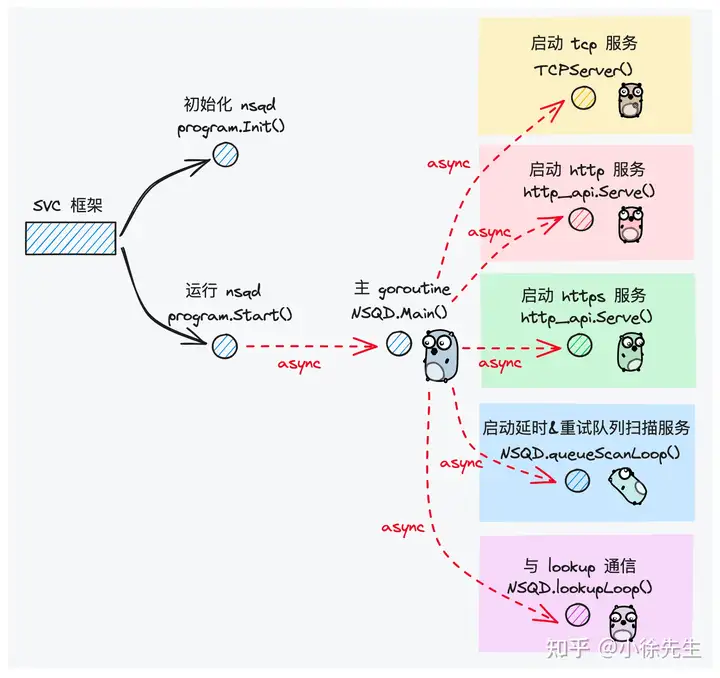
首先,nsqd 服务端的启动入口位于 apps/nsqd/main.go 文件的 main 方法中:
func main() {
    prg := &program{}
    if err := svc.Run(prg, syscall.SIGINT, syscall.SIGTERM); err != nil {
        logFatal("%s", err)
    }
}
此处 nsq 使用了 go-svc 脚手架:https://github.com/judwhite/go-svc .
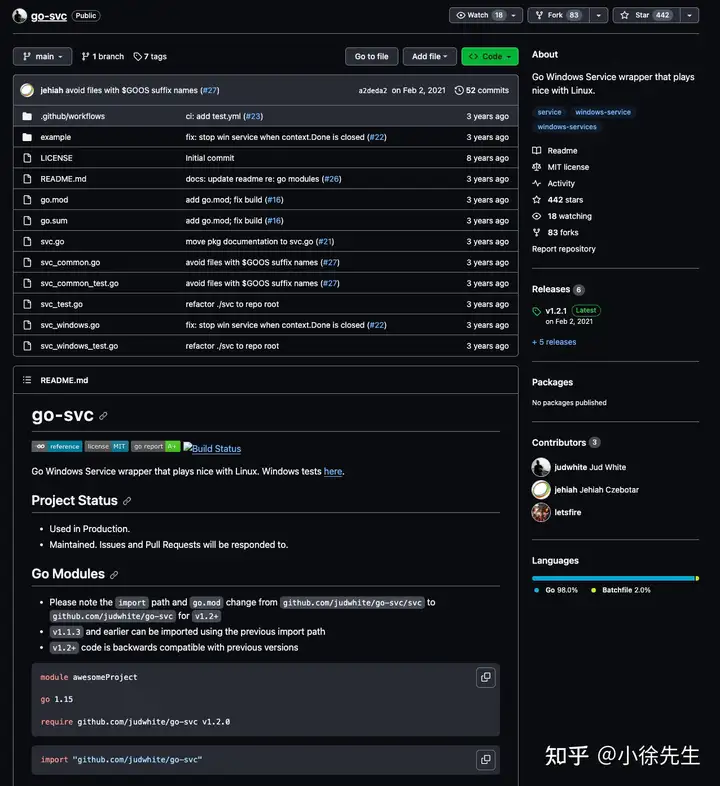
在 svc 框架中,会分别调用 program 的 Init() 和 Start() 方法,用于初始化和运行 nsqd 后台程序.
I program.Init
在 program.Init() 方法中,会读取用户输入的配置,然后构造出 nsqd 实例:
func (p *program) Init(env svc.Environment) error {
    // ...

    // 初始化 nsqd 实例
    nsqd, err := nsqd.New(opts)
    // ...
    p.nsqd = nsqd


    return nil
}
II program.Start
在 program.Start() 方法中,会异步调用 NSQD.Main() 方法,并分别在其中启动如下几个异步任务:
- 启动 tcp server:面向客户端提供服务,处理各种请求指令
- 启动 http/https server:面向客户端提供生产消息部分服务
- 启动 queueScanLoop:执行延时队列、待 ack 队列的扫描任务
- 启动 lookupLoop:与 nsqlookupd 交互,更新元数据信息
func (p *program) Start() error {
    // program 启动前会加载之前存储的历史数据信息
    err := p.nsqd.LoadMetadata()
    // ...
    err = p.nsqd.PersistMetadata()
    // ...


    go func() {
        // 调用 nsqd.Main 方法,启动 nsqd 常驻 goroutine
        err := p.nsqd.Main()
        // ...
    }()


    return nil
}
func (n *NSQD) Main() error {
    // ...
    // 启动 tcp 服务,提供 publish 和 subscribe
    n.waitGroup.Wrap(func() {
        exitFunc(protocol.TCPServer(n.tcpListener, n.tcpServer, n.logf))
    })
    // 启动 http server,提供 publish 流程有关的 api
    if n.httpListener != nil {
        httpServer := newHTTPServer(n, false, n.getOpts().TLSRequired == TLSRequired)
        n.waitGroup.Wrap(func() {
            exitFunc(http_api.Serve(n.httpListener, httpServer, "HTTP", n.logf))
        })
    }
    // 启动 https server
    if n.httpsListener != nil {
        httpsServer := newHTTPServer(n, true, true)
        n.waitGroup.Wrap(func() {
            exitFunc(http_api.Serve(n.httpsListener, httpsServer, "HTTPS", n.logf))
        })
    }


    n.waitGroup.Wrap(n.queueScanLoop)
    // 启动
    n.waitGroup.Wrap(n.lookupLoop)
    // ...


    err := <-exitCh
    return err
}
4.2.2 tcp server
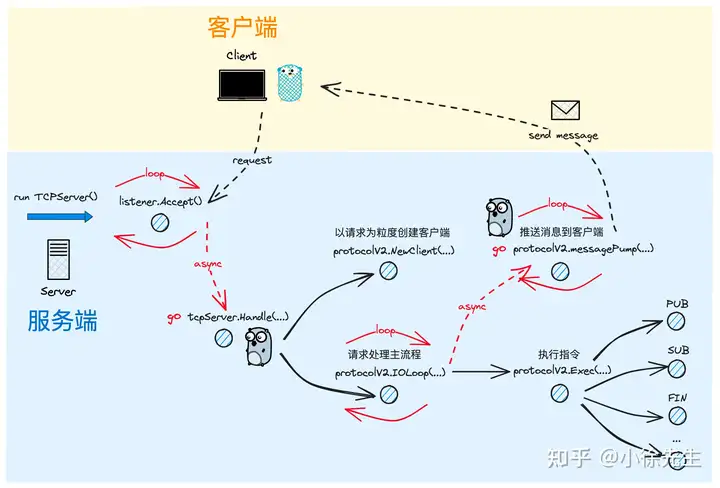
nsqd 的 tcp server 部分采用的是服务端中经典的 for + listen 模式,每当通过 listener.Accept() 方法接收到一笔来自于客户端的连接后,会为这笔连接分配一个 goroutine 处理后续到来的请求.
这部分实现与 go语言 net/http 标准库类似,listener.Accept() 方法向下延伸会使用到 linux 的 epoll 多路复用指令,这部分内容大家如果感兴趣的话,可以阅读一下我之前发表的两篇文章:
- Golang HTTP 标准库实现原理
- 解析 Golang 网络 IO 模型之 EPOLL
回归正题,tcp server 的运行方法展示如下:
func TCPServer(listener net.Listener, handler TCPHandler, logf lg.AppLogFunc) error {
    // ...


    var wg sync.WaitGroup


    for {
        // 接收新的 tcp 请求
        clientConn, err := listener.Accept()
        // ...
        wg.Add(1)
        go func() {
            // 处理请求
            handler.Handle(clientConn)
            wg.Done()
        }()
    }


    // ...
    wg.Wait()
    // ...


    return nil
}
针对于每笔到来的连接,nsqd 服务端会:
- 将 conn 封装成一个 client
- 调用 protocolV2.IOLoop() 方法,为这个连接提供服务
func (p *tcpServer) Handle(conn net.Conn) {
    // ...
    buf := make([]byte, 4)
    _, err := io.ReadFull(conn, buf)
    // ...
    protocolMagic := string(buf)
    // ...
    var prot protocol.Protocol
    switch protocolMagic {
    case "  V2":
        prot = &protocolV2{nsqd: p.nsqd}
    default:
        // ...
        return
    }


    // 基于当前请求的 conn,创建一个新的 client 实例
    client := prot.NewClient(conn)
    p.conns.Store(conn.RemoteAddr(), client)

    // 当前请求维度的常驻处理流程
    err = prot.IOLoop(client)
    // ...
    p.conns.Delete(conn.RemoteAddr())
    client.Close()
}
protocolV2.IOLoop() 方法是处理一笔客户端连接的主方法,核心步骤包括:
- 异步运行 protocolV2.messagePump(...) 方法,在其中会持续负责将需要发送的消息推送该客户端
- 读取来自客户端的请求指令,调用 protocolV2.Exec(...) 方法分类处理每一种指令
func (p *protocolV2) IOLoop(c protocol.Client) error {
    var err error
    var line []byte
    var zeroTime time.Time


    client := c.(*clientV2)


    // synchronize the startup of messagePump in order
    // to guarantee that it gets a chance to initialize
    // goroutine local state derived from client attributes
    // and avoid a potential race with IDENTIFY (where a client
    // could have changed or disabled said attributes)
    messagePumpStartedChan := make(chan bool)
    go p.messagePump(client, messagePumpStartedChan)
    <-messagePumpStartedChan


    // 启动
    for {
        // ...
        line, err = client.Reader.ReadSlice('\n')
        // ...
        var response []byte
        response, err = p.Exec(client, params)
        // ...


        if response != nil {
            err = p.Send(client, frameTypeResponse, response)
            // ...
        }
    }


    // ...
    close(client.ExitChan)
    if client.Channel != nil {
        client.Channel.RemoveClient(client.ID)
    }
    return err
}
protocolV2.Exec(...) 方法中,会根据各类指令,dispatch 到各种处理方法当中. 本文重点介绍的指令包括:
- PUB:生产者 publish 消息的指令,本文 4.3 小节详细展开
- SUB:消费者 subscribe topic + channel 的指令,本文 4.4. 小节详细展开
- FIN:消费者 ack 消息的指令,本文 4.5.3 小节中详细展开
func (p *protocolV2) Exec(client *clientV2, params [][]byte) ([]byte, error) {
    // ...
    switch {
    // ...
    case bytes.Equal(params[0], []byte("PUB")):
        return p.PUB(client, params)
    // ...
    case bytes.Equal(params[0], []byte("SUB")):
        return p.SUB(client, params)
    // ...
    case bytes.Equal(params[0], []byte("FIN")):
        return p.FIN(client, params)
    }
    return nil, protocol.NewFatalClientErr(nil, "E_INVALID", fmt.Sprintf("invalid command %s", params[0]))
}
4.3 publish 流程
下面我们展开 nsqd 服务端针对 PUB 指令的处理流程. 这部分属于本文中绝对核心的内容.
4.3.1 topic -> channel
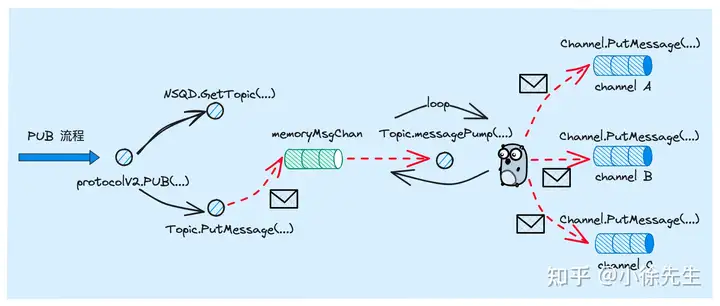
在 protocolV2.PUB(...) 方法中:
- 调用 io.ReadFull(...) 方法,读取消息数据
- 调用 NSQD.GetTopic(...) 方法获取到消息所属的 topic(一条被生产出来的消息会明确从属于某一个 topic)
- 调用 topic.PutMessage(...) 方法,将消息推送给对应的 topic. 其本质上会通过 Topic.memoryMsgChan 或 Topic.backend 进行消息传递,让 topic 的常驻运行 goroutine Topic.messagePump(...) 方法接收到这条消息
func (p *protocolV2) PUB(client *clientV2, params [][]byte) ([]byte, error) {
    var err error


    // ...
    topicName := string(params[1])
    // ...


    bodyLen, err := readLen(client.Reader, client.lenSlice)
    // ...
    messageBody := make([]byte, bodyLen)
    _, err = io.ReadFull(client.Reader, messageBody)
    // ...


    topic := p.nsqd.GetTopic(topicName)
    msg := NewMessage(topic.GenerateID(), messageBody)
    err = topic.PutMessage(msg)
    // ...


    client.PublishedMessage(topicName, 1)


    return okBytes, nil
}
// PutMessage writes a Message to the queue
func (t *Topic) PutMessage(m *Message) error {
    t.RLock()
    defer t.RUnlock()
    // ...
    err := t.put(m)
    // ...
    return nil
}
nsqd 服务端处理 sub 指令流程:
func (t *Topic) put(m *Message) error {
    // ...
    if cap(t.memoryMsgChan) > 0 || t.ephemeral || m.deferred != 0 {
        select {
        // 写到内存中
        case t.memoryMsgChan <- m:
            return nil
        // 内存 chan 已满,则写入到磁盘
        default:
            break // write to backend
        }
    }
    err := writeMessageToBackend(m, t.backend)
    // ...
    return nil
}
接下来我们再观察一下 Topic.messagePump() 方法. 其中在读取到新消息后,会遍历当前 topic 下的 channel,逐一调用 Channel.PutMessage(...) 方法,将消息传递到每个 channel 中.
func (t *Topic) messagePump() {
    // ...
    for {
        select {
        case msg = <-memoryMsgChan:
        case buf = <-backendChan:
            msg, err = decodeMessage(buf)
            // ...
        // ...
        }


        for i, channel := range chans {
            chanMsg := msg
            // ...
            // 延迟消息特殊处理
            if chanMsg.deferred != 0 {
                channel.PutMessageDeferred(chanMsg, chanMsg.deferred)
                continue
            }
            err := channel.PutMessage(chanMsg)
            // ...
        }
    }
// ...
}
在 Channel.PutMessage(...) 方法中,会将消息通过 Channel.memoryMsgChan 或者 Channel.backend,将消息随机传递到某个订阅了该 channel 的 consumer client 对应的 protocolV2.messagePump(...) goroutine 当中.
此处呼应了 4.2.2 小节,该方法会于 4.3.2 小节详细展开.
func (c *Channel) PutMessage(m *Message) error {
    c.exitMutex.RLock()
    defer c.exitMutex.RUnlock()
    // ...
    err := c.put(m)
    // ...
    atomic.AddUint64(&c.messageCount, 1)
    return nil
}
func (c *Channel) put(m *Message) error {
    select {
    case c.memoryMsgChan <- m:
    default:
        err := writeMessageToBackend(m, c.backend)
        c.nsqd.SetHealth(err)
        // ...
    }
    return nil
}
4.3.2 channel -> consumer
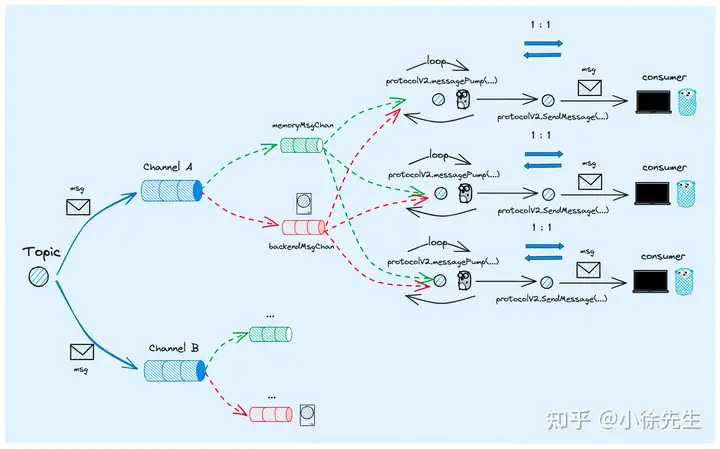
当一条消息从 topic 被一一推送到每个 channel 的 memoryMsgChan 和 backendChan 中时,这笔数据会随机被一个订阅了该 channel 的 consumer 消费.
这种随机与互斥的性质得以实现的原因是,是多个 consumer 竞争消费同一个 memoryMsgChan 和 backendChan 中的数据,因此同一条数据一定只能被一个 consumer client 所获取到.
consumer 消费 channel 数据的内容可以参见方法 protocolV2.messagePump(),该方法是与每一个连接 nsqd 服务端的客户端连接一一对应的.
值得一提的是,只有某个 client 执行了订阅 channel 的指令,此时才能从 client.SubEventChan 下接收到该 channel 对应的 subChannel,并进一步获得该 channel 的 memoryMsgChan 和 backendChan. 这部分会与 3.4 小节的内容形成呼应.
func (p *protocolV2) messagePump(client *clientV2, startedChan chan bool) {
    var err error
    var memoryMsgChan chan *Message
    var backendMsgChan <-chan []byte
    var subChannel *Channel
    // ...
    // 当前 client 用于接收 subChannel 的通道
    subEventChan := client.SubEventChan
    // ...


    for {

        // ...
        // 倘若当前 client 执行 sub 指令,次数获取到订阅 channel 下用于传递消息的 memoryMsgChan
        memoryMsgChan = subChannel.memoryMsgChan
        backendMsgChan = subChannel.backend.ReadChan()
        flusherChan = outputBufferTicker.C

        // ...
        select {
        // ...
        // 首先,倘若当前 client 执行的是 sub 指令,则此处会获取到该客户端订阅的 channel
        // 倘若 client 发送的指令是 SUB,则其订阅的 channel 会通过 subEventChan 发送过来
        case subChannel = <-subEventChan:
            // you can't SUB anymore
            subEventChan = nil
        // ...
        // 尝试接收订阅 channel 下的 backendMsgChan
        case b := <-backendMsgChan:
            // ...
            msg, err := decodeMessage(b)
            // ...
            // 发送消息前,先将消息添加到待 ack 确认队列中
            subChannel.StartInFlightTimeout(msg, client.ID, msgTimeout)
            client.SendingMessage()
            // 将消息发送到 client
            err = p.SendMessage(client, msg)
            // ...
        // 尝试接收订阅 channel 下的 memoryMsgChan
        case msg := <-memoryMsgChan:
            // ...
            // 发送消息前,先将消息添加到待 ack 确认队列中
            subChannel.StartInFlightTimeout(msg, client.ID, msgTimeout)
            client.SendingMessage()
            // 将消息发送到 client
            err = p.SendMessage(client, msg)
            // ...
        }
    }


    // ...
}向客户端发送消息的方法链路展示如下,核心是获取 client 中的 tcp 连接,然后向 io writer 中写入数据发往客户端:
func (p *protocolV2) SendMessage(client *clientV2, msg *Message) error {
    // ...
    buf := bufferPoolGet()
    defer bufferPoolPut(buf)


    _, err := msg.WriteTo(buf)
    // ...


    err = p.Send(client, frameTypeMessage, buf.Bytes())
    // ...
}
func (p *protocolV2) Send(client *clientV2, frameType int32, data []byte) error {
    // ...
    _, err := protocol.SendFramedResponse(client.Writer, frameType, data)
    // ...
}
func SendFramedResponse(w io.Writer, frameType int32, data []byte) (int, error) {
    // ...
    n, err = w.Write(data)
    // ...
}
4.4 subscribe 流程
接下来我们一起梳理下 consumer 向 nsqd 服务端发起 subscribe 指令的流程.
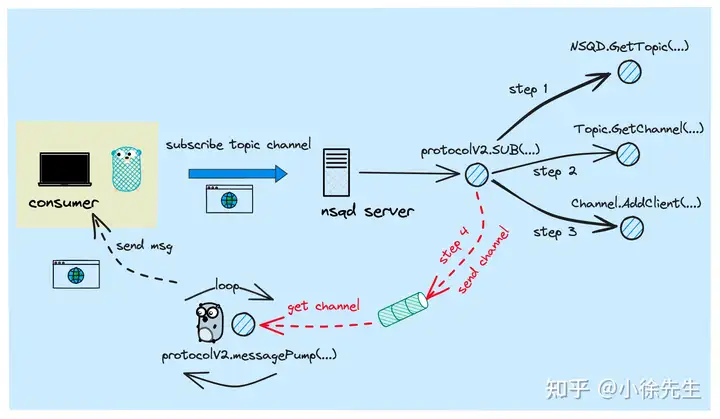
4.4.1 sub 主流程
处理 SUB 指令的入口方法为 protocolV2.SUB(...),其核心步骤是:
- 在订阅 channel 的 client 集合中添加当前 client
- 将订阅的 channel 发送到当前 client 的 SubEventChan 中,供 protocolV2.messagePump() goroutine 接收和处理
func (p *protocolV2) SUB(client *clientV2, params [][]byte) ([]byte, error) {
    // ...
    topicName := string(params[1])
    // ...


    channelName := string(params[2])
    // ...
    var channel *Channel
    for i := 1; ; i++ {
        topic := p.nsqd.GetTopic(topicName)
        channel = topic.GetChannel(channelName)
        if err := channel.AddClient(client.ID, client); err != nil {
            // ...
        }


        // ...
        break
    }
    atomic.StoreInt32(&client.State, stateSubscribed)
    client.Channel = channel
    // update message pump
    client.SubEventChan <- channel


    return okBytes, nil
}
在 1.2 小节中,我们有提到,channel 是在首次被 consumer 订阅时自动创建的,该流程对应的方法链路如下:
func (t *Topic) GetChannel(channelName string) *Channel {
    t.Lock()
    channel, isNew := t.getOrCreateChannel(channelName)
    t.Unlock()
    // ...
    return channel
}
// this expects the caller to handle locking
func (t *Topic) getOrCreateChannel(channelName string) (*Channel, bool) {
    channel, ok := t.channelMap[channelName]
    if !ok {
        // ...
        channel = NewChannel(t.name, channelName, t.nsqd, deleteCallback)
        t.channelMap[channelName] = channel
        // ...
        return channel, true
    }
    return channel, false
}
4.4.2 pump 协程接收 chan
对应于每个 consumer client 会有一个运行 protocolV2.messagePump(...) 方法的 goroutine,其中会通过 client.SubEventChan 接收到订阅的 channel,然后从对应的 memoryMsgChan 和 backendChan 中接收消息:
func (p *protocolV2) messagePump(client *clientV2, startedChan chan bool) {
    var err error
    var memoryMsgChan chan *Message
    var backendMsgChan <-chan []byte
    var subChannel *Channel
    // ...
    subEventChan := client.SubEventChan
    // ...


    for {

        // ...
        // 倘若当前 client 执行 sub 指令,次数获取到订阅 channel 下用于传递消息的 memoryMsgChan
        memoryMsgChan = subChannel.memoryMsgChan
        backendMsgChan = subChannel.backend.ReadChan()
        flusherChan = outputBufferTicker.C

        // ...
        select {
        case subChannel = <-subEventChan:
            // you can't SUB anymore
            subEventChan = nil
        // ...
        }
    }
    // ...
}
4.5 inFlight&ack 机制
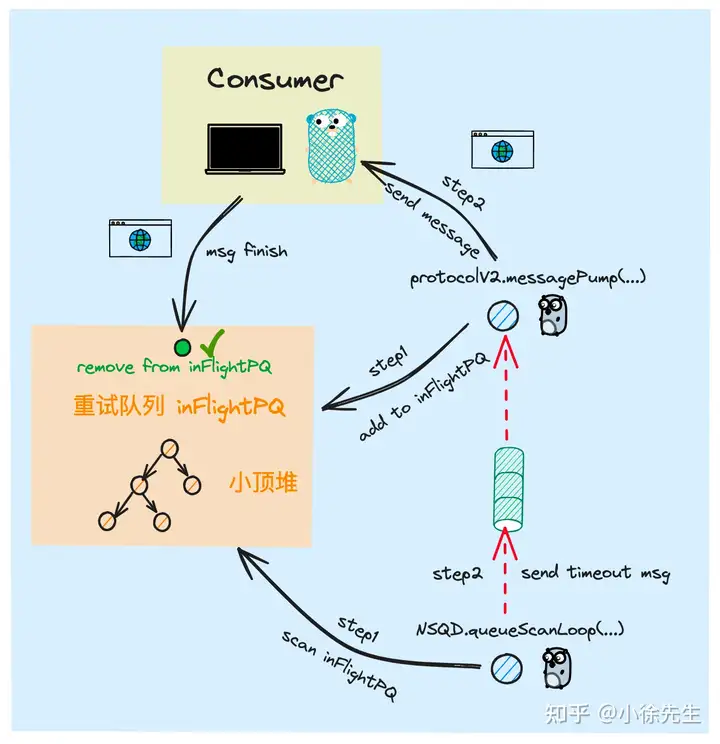
下面我们捋一下,nsq 为保证消息不丢失而提供的 inFlight 和 ack 机制.
4.5.1 StartInFlight
在 protocolV2.messagePump(...) 方法中,每当从 channel 中接收到消息要发往客户端之前,都会先调用 Channel.StartInFlightTimeout(...) 方法,将消息添加到待 ack 确认队列 inFlightPQ 当中:
func (p *protocolV2) messagePump(client *clientV2, startedChan chan bool) {
    // ...
    for {
        // ...
        select {
        // ...
        case b := <-backendMsgChan:
            // ...
            subChannel.StartInFlightTimeout(msg, client.ID, msgTimeout)
            // ...
            err = p.SendMessage(client, msg)
            // ...
        case msg := <-memoryMsgChan:
            // ...
            subChannel.StartInFlightTimeout(msg, client.ID, msgTimeout)
            // ...
            err = p.SendMessage(client, msg)
            // ...
        }
    }
    // ...
}
添加消息进入 inFlightPQ 前,会根据用户设置的超时重试时间,推算出消息重试的执行时间,以时间戳作为排序的键,将消息添加进入小顶堆中.
func (c *Channel) StartInFlightTimeout(msg *Message, clientID int64, timeout time.Duration) error {
    now := time.Now()
    msg.clientID = clientID
    msg.deliveryTS = now
    msg.pri = now.Add(timeout).UnixNano()
    err := c.pushInFlightMessage(msg)
    if err != nil {
        return err
    }
    c.addToInFlightPQ(msg)
    return nil
}
func (c *Channel) addToInFlightPQ(msg *Message) {
    c.inFlightMutex.Lock()
    c.inFlightPQ.Push(msg)
    c.inFlightMutex.Unlock()
}
4.5.2 queueScan
在 nsqd 节点启动时,会异步启动一个 gorouting 执行 NSQD.queueScanLoop() 方法,该方法的用途就是定时轮询 inFlightPQ 和 deferredPQ,取出其中达到时间条件的消息进行执行:
func (n *NSQD) Main() error {
    // ...
    n.waitGroup.Wrap(n.queueScanLoop)
    // ...
}
func (n *NSQD) queueScanLoop() {
    workCh := make(chan *Channel, n.getOpts().QueueScanSelectionCount)
    // ...
    // 轮询时间间隔
    workTicker := time.NewTicker(n.getOpts().QueueScanInterval)
    // ...
    refreshTicker := time.NewTicker(n.getOpts().QueueScanRefreshInterval)


    channels := n.channels()
    // 在方法中会启动 scan worker goroutine
    n.resizePool(len(channels), workCh, responseCh, closeCh)
    // ...
    for {
        select {
        case <-workTicker.C:
            // ...
        // ...
        }


        num := n.getOpts().QueueScanSelectionCount
        if num > len(channels) {
            num = len(channels)
        }


        // ...
        // 将需要扫描的 channel 通过 workCh 发给 scan worker goroutine
        for _, i := range util.UniqRands(num, len(channels)) {
            workCh <- channels[i]
        }


         // ...
    }
}
func (n *NSQD) resizePool(num int, workCh chan *Channel, responseCh chan bool, closeCh chan int) {
    // ...
    for {
        // ...
        n.waitGroup.Wrap(func() {
            n.queueScanWorker(workCh, responseCh, closeCh)
        })
        n.poolSize++
    }
}
queueScanWorker 是 nsqd 节点下异步运行的 goroutine,每当通过 workCh 接收到 channel 时,会调用 Channel.processInFlightQueue(...) 方法,完成扫描任务:
func (n *NSQD) queueScanWorker(workCh chan *Channel, responseCh chan bool, closeCh chan int) {
    for {
        select {
        case c := <-workCh:
            now := time.Now().UnixNano()
            dirty := false
            if c.processInFlightQueue(now) {
                dirty = true
            }
            // ...
            responseCh <- dirty
        // ...
        }
    }
}在扫描任务中,每次会尝试从 inFlightPQ 堆顶弹出达到执行时间的消息,然后调用 Channel.put(...) 方法将消息传递到某个订阅了该 channel 的 client 手中:
func (c *Channel) processInFlightQueue(t int64) bool {
    c.exitMutex.RLock()
    defer c.exitMutex.RUnlock()


    if c.Exiting() {
        return false
    }


    dirty := false
    for {
        c.inFlightMutex.Lock()
        // 倘若堆顶的消息已经达到执行时间,则弹出对应的消息
        msg, _ := c.inFlightPQ.PeekAndShift(t)
        c.inFlightMutex.Unlock()


        // 倘若堆顶消息未达到执行时间,则结束本次任务
        if msg == nil {
            goto exit
        }
        dirty = true


        _, err := c.popInFlightMessage(msg.clientID, msg.ID)
        if err != nil {
            goto exit
        }
        atomic.AddUint64(&c.timeoutCount, 1)
        c.RLock()
        client, ok := c.clients[msg.clientID]
        c.RUnlock()
        if ok {
            client.TimedOutMessage()
        }
        // 发送重试消息
        c.put(msg)
    }


exit:
    return dirty
}
4.5.3 ack
倘若某条消息已经得到了 consumer 的 ack,则 nsqd 服务端会接收到来自 consumer 发送的 FIN 指令,然后步入到 protocolV2.FIN(...) 方法当中:
func (p *protocolV2) Exec(client *clientV2, params [][]byte) ([]byte, error) {
    // ...
    switch {
    case bytes.Equal(params[0], []byte("FIN")):
        return p.FIN(client, params)
    // ...
    }
    // ...
}
在 protocolV2.FIN(...) 方法中,会获取到消息的唯一 id,然后调用 Channel.FinishMessage(...) 方法,将消息从 channel 的 inFlightPQ 当中移除:
func (p *protocolV2) FIN(client *clientV2, params [][]byte) ([]byte, error) {
    // ...
    id, err := getMessageID(params[1])
    // ...
    err = client.Channel.FinishMessage(client.ID, *id)
    // ...
    client.FinishedMessage()


    return nil, nil
}
// FinishMessage successfully discards an in-flight message
func (c *Channel) FinishMessage(clientID int64, id MessageID) error {
    msg, err := c.popInFlightMessage(clientID, id)
    // ...
    c.removeFromInFlightPQ(msg)
    // ...
}
func (c *Channel) removeFromInFlightPQ(msg *Message) {
    c.inFlightMutex.Lock()
    // ...
    c.inFlightPQ.Remove(msg.index)
    c.inFlightMutex.Unlock()
}
4.6 deferred 机制
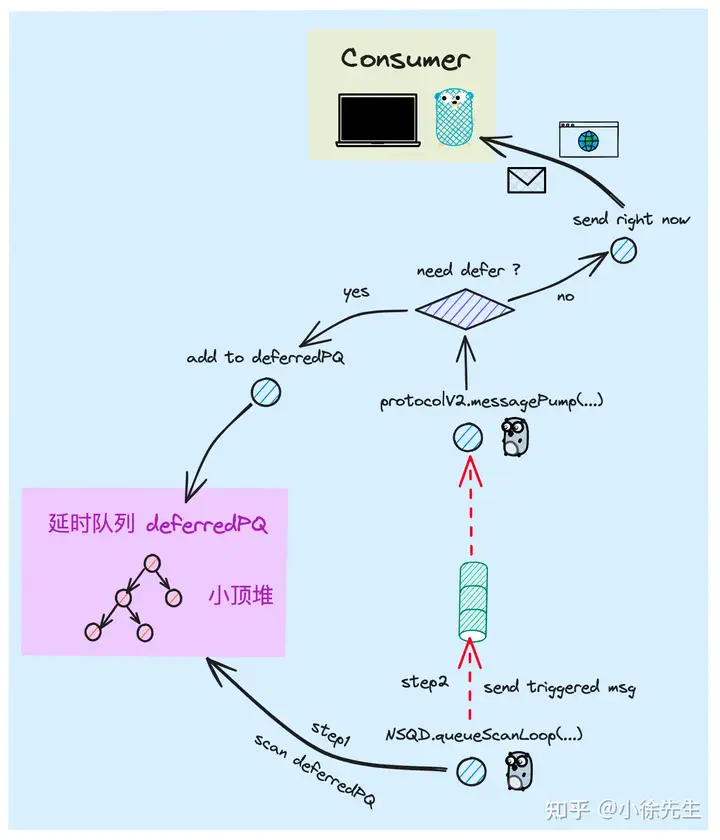
下面我们梳理一下 nsq 实现延时消息的流程.
4.6.1 添加延时队列
首先在 publish 流程中,消息由 topic 发放每个 channel 前,会先判断消息是否为延时消息类型. 倘若为延时消息,则会调用 Channel.PutMessageDeferred(...) 方法追加到延时队列当中.
func (t *Topic) messagePump() {
    // ...
    for {
        select {
        case msg = <-memoryMsgChan:
        case buf = <-backendChan:
            msg, err = decodeMessage(buf)
            // ...
        // ...
        }


        for i, channel := range chans {
            chanMsg := msg
            // ...
            // 延迟消息特殊处理
            if chanMsg.deferred != 0 {
                channel.PutMessageDeferred(chanMsg, chanMsg.deferred)
                continue
            }
            // ...
        }
    }
    // ...
}添加消息进入延时队列的方法链路如下,其中主要是通过当前时刻结合延时设置,推算出消息的执行时刻,然后以该时间戳为排序键,将消息添加到 deferredPQ 的小顶堆中.
func (c *Channel) PutMessageDeferred(msg *Message, timeout time.Duration) {
    atomic.AddUint64(&c.messageCount, 1)
    c.StartDeferredTimeout(msg, timeout)
}
func (c *Channel) StartDeferredTimeout(msg *Message, timeout time.Duration) error {
    absTs := time.Now().Add(timeout).UnixNano()
    item := &pqueue.Item{Value: msg, Priority: absTs}
    err := c.pushDeferredMessage(item)
    // ...
    c.addToDeferredPQ(item)
    return nil
}
func (c *Channel) pushDeferredMessage(item *pqueue.Item) error {
    c.deferredMutex.Lock()
    // TODO: these map lookups are costly
    id := item.Value.(*Message).ID
    _, ok := c.deferredMessages[id]
    if ok {
        c.deferredMutex.Unlock()
        return errors.New("ID already deferred")
    }
    c.deferredMessages[id] = item
    c.deferredMutex.Unlock()
    return nil
}
func (c *Channel) addToDeferredPQ(item *pqueue.Item) {
    c.deferredMutex.Lock()
    heap.Push(&c.deferredPQ, item)
    c.deferredMutex.Unlock()
}
4.6.2 处理延时任务
扫描执行延时队列的流程与 4.5.2 小节介绍的处理待确认消息的流程类似,都是以 NSQD.queueScanWorker(...) 方法为入口,定时轮询延时队列,找到满足时间条件的消息,调用 Channel.put(...) 方法发送消息.
func (n *NSQD) queueScanWorker(workCh chan *Channel, responseCh chan bool, closeCh chan int) {
    for {
        select {
        case c := <-workCh:
            now := time.Now().UnixNano()
            // ...
            if c.processDeferredQueue(now) {
                dirty = true
            }
        // ...
        }
    }
}
执行
func (c *Channel) processDeferredQueue(t int64) bool {
    c.exitMutex.RLock()
    defer c.exitMutex.RUnlock()


    // ...
    dirty := false
    for {
        c.deferredMutex.Lock()
        // 倘若堆顶的消息已经达到执行时间条件,则取出进行执行
        item, _ := c.deferredPQ.PeekAndShift(t)
        c.deferredMutex.Unlock()
        // 倘若堆顶的消息都尚未达到执行时间条件,则结束本次任务
        if item == nil {
            goto exit
        }
        dirty = true


        msg := item.Value.(*Message)
        _, err := c.popDeferredMessage(msg.ID)
        if err != nil {
            goto exit
        }
        // 发送延时消息,由  protocolV2.messagePump(..) 方法接收处理
        c.put(msg)
    }


exit:
    return dirty
}
5 总结
本期向大家详细分享了一款完全基于 go 语言实现的分布式消息队列——nsq. 文中分别向大家详细介绍了有关 nsq 的核心概念、使用教程,并且和大家一起深入到 nsq 项目源码当中,逐一向大家揭示了 nsq 客户端与服务端项目的底层技术细节.
这里比较自信地说一句,只要大家认真阅读完本文,对于 nsq 的理解程度一定能做到“遥遥领先”!